Finally, I
can show you little Silvia’s quilt. Last week I was able to know this two-month
old little baby and give her the quilt I made just for her. I hope she’ll enjoy
as much as her mother told me her brother Martín did, and already does!
viernes, 29 de julio de 2016
Una manta para una princesa
viernes, 22 de julio de 2016
Un bies que no está al bies
2) Planchamos por la mitad toda la tira.
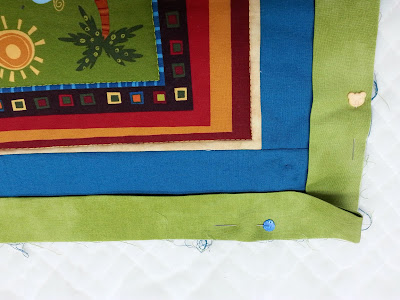
3) Colocamos el bies a ras del borde de la manta, la parte con los bordes de la tira con el borde de la manta y la parte de la doblez de la tira para dentro (¡vaya lío de bordes! ¿Se entiende?).
4) Ojo con las esquinas, tienen que quedar colocadas de la siguiente manera:
5) Hilvanamos todo el perímetro. En las esquinas no llegamos con el hilván hasta el final. Luego pasamos un pespunte por todo el perímetro. En las esquinas tenemos que coser hasta el hilván en uno de los lados (de nuevo sin llegar al final) y hacer el pespunte hasta el final en el otro lado.
7) Después recortamos los sobrantes de guata y trasera a la distancia necesaria para hacer el bies del grosor que queremos, en mi caso he dejado un centímetro más o menos...
8) Doblamos el bies hacia la trasera y sujetamos con alfileres. Poco a poco vamos cosiendo el borde del bies a la tela con puntada escondida. Sujetad bien las esquinas para que queden en su sitio.
9) ¡Y por fin el "bies no-bies" está terminado!
Mucho más sencillo que el "bies al bies" y con resultados parecidos en este tipo de proyectos.
De todas maneras os debo un minitutorial para cortar "bies al bies".
Y en breve espero poder enseñaros la mantita terminada, ¡que es una locura!
¡Buen fin de semana!
Sometimes is
not easy to find the perfect bias tape for a project: the color you like is not
available, for example. That’s why doing it yourself is a great idea. In this
case, I didn’t need to cut it diagonally so the job was even easier. Here you
have the step-by-step tutorial I’ve made of the process in case it’s useful for
customize in an original way your projects.
viernes, 15 de julio de 2016
Encargos especiales - Funda para cubiertos
Una vez tengamos el rectángulo, volvemos a tomar medidas para que quede doblado como nos conviene:
Y le pasamos una puntada decorativa por los bordes:
Some time
ago, a couple of friends and job mates asked me to perform them a cover for the
cutlery they use when we eat at the office. I designed it thinking in a protective
cover while kept in the drawer, and a place mat when using them. I’ve made some
pics during the process in case you want to do something similar for your
cutlery, or whatever…
viernes, 8 de julio de 2016
Manta infantil - Había una vez un barquito chiquitito...
Finally I can show you Miguel’s quilt! I’ve been posting some details of it, as its punchneedle clouds, the quilting safety pins I used when quilting it, or the masking tape tip to embroider Miguel’s name and date of birth on the back. It was finished months ago but till now I couldn’t meet him… He is sooooo cute!
viernes, 1 de julio de 2016
Work in progress - Manta infantil
I’m facing some problems for meeting my friend’s babies and giving them the gifts I’ve made for them. I’m trying to avoid just sending them; it’s more impersonal and cold. Seeing the faces of the new parents while opening the presents it’s something incredible and one of the most rewarding moments. So, I have some finished projects waiting their moment to be shared in the blog with all of you. I can’t see the moment of that but I don’t want to waist the surprise effect so I just try to control myself of doing it… Meanwhile, here you have a brief image of my current project. I’m totally in love with this fabric! The owner is expected for August so I will probably enjoy my summer holidays loosing myself into its details…
Suscribirse a:
Comentarios (Atom)


